Granted, your AR15 charging handle is far from the part that will require the most maintenance. You’ll spend more time cleaning the barrel, muzzle device, and bolt carrier group, but at the same time, a charging handle that’s running in a channel gummed up with fouling or old grease will not afford the most pleasant (or the smoothest) shooting experience. In extreme cases, an occluded or fouled charging handle channel can even jam, making manual charging difficult.
That said, this short guide will show you how to disassemble, clean, and lubricate your side-charging AR 15 charging handle (what you’ll find on our Gen 2 uppers). Here’s what to know.
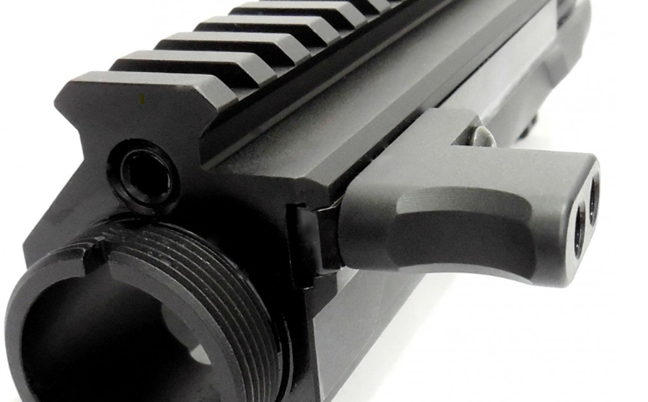
Step One: Disassembly
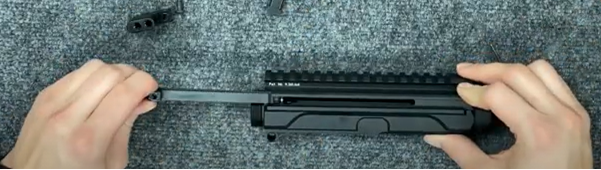
The first step to a clean AR15 charging handle is taking it apart. Once you have the uppers separate and the barrel removed, you can get started deconstructing the charging handle assembly itself.
To do so, you will need an ⅛” Allen wrench. Start by loosening and removing the front set screw on the charging handle. A spring should come out behind it. Remove that and place aside.
Next, remove the second (rearmost) set screw, also using the same Allen wrench. Now you can remove the button head at the front base of the charging handle. It also requires an ⅛” Allen wrench.
Now you can pull the AR 15 charging handle itself off, followed by the detent that helps secure it to the transfer bar.
Next, slide the transfer bar out of the channel that secures it, followed by the slide cover.
That’s all there is to disassembling our Gen 2 side-charging handles. For further information or visual representation, please see the following video on our official YouTube channel.
Step Two (If Necessary) Cleaning
With the AR15 charging handle completely disassembled to its constituent components, now you can clean them all up before reassembly.
Bear in mind that most of the components of the charging handle will not need a thorough cleaning under most circumstances. In fact, for a routine cleaning after a visit to the range, you can likely skip cleaning the charging handle assembly altogether.
Nonetheless, if you’ve broken it down, you’ll want to give each component a look over and see what needs to be cleaned.
First, let’s look at the fasteners. If any of your set screws have dirt or fouling on the threads, use a microfiber rag, or a combination of a soft nylon brush and a microfiber rag to remove them. Fouling and debris can damage threads, and worse, can cause them to seize in place if you don’t clean them up.
Next, let’s look at the detent. Since this piece is basically fully enclosed, it shouldn’t be too dirty, but if it has any fouling or tar, wipe these off. You can use a powder solvent or a mild detergent to do so, if necessary.
As for the AR 15 charging handle itself, give it a look over and wipe off any oil, grease, fouling or debris that’s present, using a powder solvent or warm soap and water to do so. Set it aside to dry.
Now let’s look at the transfer bar and its corresponding channel in the upper receiver. These are the two components of this assembly that will likely need the most attention, if any is needed at all.
Dirt, sand, fouling, and other debris can accumulate along the transfer bar since it is open to the elements and communicates directly with the bolt carrier group. The level of fouling or debris accumulation will, however, be determined primarily by your operating conditions. In some instances you might strip the charging handle and find an immaculate transfer bar.
At any rate, now is the time to clean the transfer bar. Use a stiff nylon or brass brush along with a powder solvent to remove any fouling or tar, then wipe it clean and dry after you’re finished.
As for the transfer bar channel, use a nylon pick to remove any debris from the channel, then wipe it clean as best you can. You don’t want to re-install the transfer bar if there is anything left in the channel that can cause jamming or accelerated abrasive wear.
Step Three: Lubrication
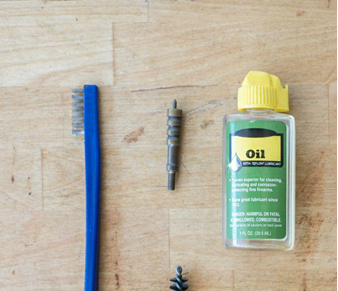
Now that all the components of your side-charger have been cleaned, set them aside to dry. Once they’ve dried fully, you can apply lubricant sparingly where needed, then reassemble.
Really, the only component of the charging handle that will need any lubricant is the transfer bar. A single drop of gun oil on the bar will go a long way. You can also put a drop on each rail of the channel if you like, but if you do this, don’t apply any oil to the transfer bar itself.
You want to keep liquid lubrication to a minimum because, while it does facilitate a smoother action, it can also trap hair, dirt, dust and other debris that paradoxically will accelerate wear.
After you’ve done that, the only other place you might want to apply a drop of oil is to the threads of the set screws; although here, you’re not applying the oil as a lubricant, but as an oxidative barrier.
As long as the threads are clean, a single drop of oil on each can help insulate them against corrosive compounds, helping to ensure they do not rust or seize, which would make it harder or impossible in the future to disassemble the charging handle.to disassemble the charging handle.
Step Four: Reassemble Your AR15 Charging Handle and Upper
To reassemble the AR15 charging handle assembly, simply perform the actions covered in step one of this post, in reverse order. You can see the video posted in the previous section for detailed, step-by-step instructions.
Once you’ve reassembled and reinstalled the AR 15 charging handle, work it manually a few times to distribute any oil you applied to the transfer bar and channel to coat them, and to ensure that it racks as normal.